
 |
| Privacy | Copyright | | |
| Dash Removal 1989-94 Blazer/Jimmy/S-Series/Bravada/Sonoma/Tahoe | |
|
Scroll To the bottom of this page for removal of 2003-2006 GM Truck Clusters.
|
|
|
|
|
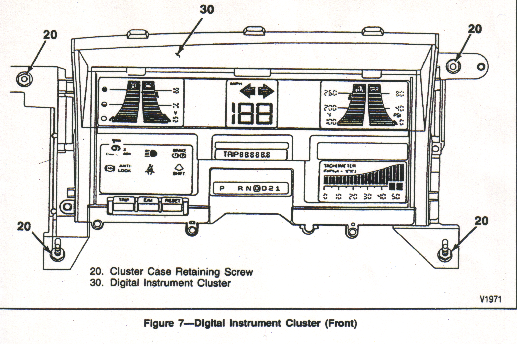
| Dash Removal Drawing #1 | |
|
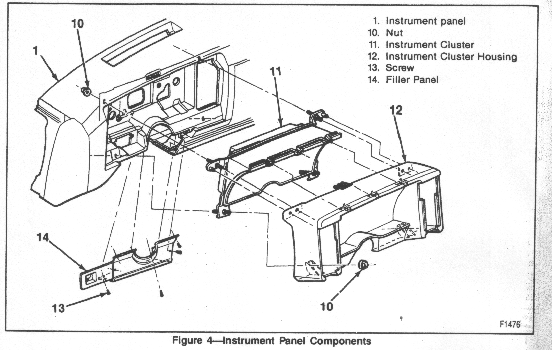
Use removal drawings 1,2 and 3 and the Heater Control Removal instructions below as an aid to remove your digital dash.
These are .BMP files.
NOTE: FOLLOW THESE INSTRUCTIONS AT YOUR OWN RISK. THEY ARE PROVIDED FOR YOUR INFORMATION ONLY, SUMMARIZED FROM FACTORY SERVICE MANUALS AND OTHER INFORMATION SOURCES, BUT ARE NOT GUARANTEED IN ANY WAY. IF IN DOUBT ABOUT ANY STEP OF THE PROCESS (OR EVEN BEFORE YOU BEGIN), CHECK WITH A PROFESSIONAL MECHANIC.
|
|
| Dash Removal Drawing #2 | |
|
|
|
| Dash Removal Drawing #3 | |
|
|
|
| Blazer/Jimmy/Bravada/S-Series Heater Control Removal | |
|
New Method (let us know how this method works!) Thanks to John Greene for taking the time to submit this method. Remove the 2 screws underneath heater controls. Pull the unit out as much as you can. DO NOT disconnect vent cable or vacuum hoses. Remove the 2 screws that hold controls to faceplate and unscrew the 2 (bulbs) lights in face plate. Pull knobs off of control lever and plate comes off leaving all controls connected.
Instrument panel comes off over the disassembled heater control and the lights/dimmer switch assembly.
When reassembling the heater control replace the 2 screws that hold controls to faceplate with a stud and nut which is much easier to work with. Old Method (may be more difficult) "Remove the 2 screws underneath the heater control. Pull the control assembly slightly forward. Remove three electrical connectors using a small screwdriver. The vacuum connector has one or two pressed on lock washers.Remove them with a pair of needle nose pliers. Disconnect the vent cable by removing pressed on lock washer. From the back, slip in a small screwdriver to the area that the red plastic cable lock is in. There is a black piece of plastic that you pry away. The black piece of plastic has a small rod on it that goes through a small hole in the red cable lock. Once pried away
the cable lock will come out and then the assembly is loose."
|
|
| Customer Submitted Dash Removal Tips | |
|
Many Thanks to Brian Hawker for providing us with his experience on removing the dash from his 1989 GMC S15 Jimmy.
1) DEFINITELY fill the tank with gas. I guess I wasn't sure what to expect
until
I had it out, but it wasn't until then that I realized that I would have no
odometer
or gear indicator. 2) Have a metric ratchet wrench set available that has those "extended" bits
in them (the ones that are about 2 inches long). The screws or bolts that
the dash attaches to are at least one inch long, and the normal sized bits
are not long enough to fit over them. Before I get the unit back, I will
definitely buy a 10 MM, 2 inch long bit.
3) Have small flashlight, notepad, and pen or pencil handy. The former makes
it easier to see what you're working wth, and the latter allows you to make
some quick notes about which electrical connections go where and which way
the vaccum hoses go.
4) On my truck, I almost panicked at the end because when I tried to pull the
dash out, there was a thin grey "wire" attached to the steering column, and I
wasn't sure what it did or how to detach it. Then I looked with a flashlight
and realized that it was
just a cable that moved the gear indicator. and that it was just clipped to
the steering
column. I unclipped it and I was all set. NOTE: DO NOT cut this wire!
5) I think a "copier paper box" is going to be about the most perfect thing
to
ship it in. I would recommend those to your clients (along with the padding
you
listed). Those boxes are available in just about any office.
6) Last, but not least, I would make sure that people understand that they
can drive their vehicle, but will be without the mileage or gear indicator
(at least on my truck, that is the case). They should plan to keep all
driving to a minimum until they get the dash back, and be careful when
shifting to make sure that they are in the right gear.
Thank you very much,
Brian K. Hawker
|
|
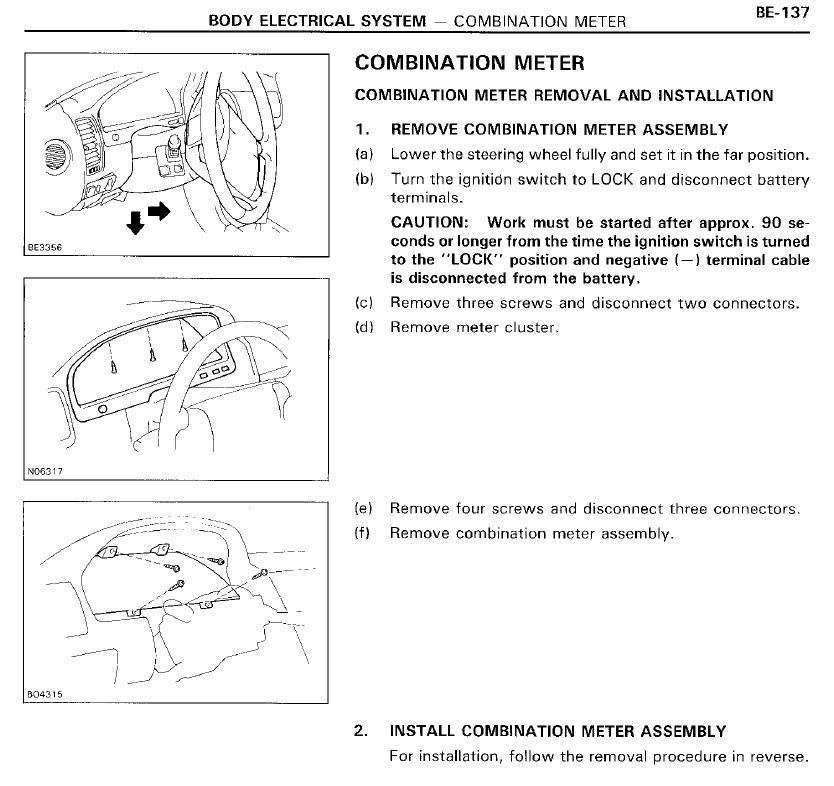
| Lexus LS-400 Instrument Cluster Removal | |
| Lexus LS400 Instrument Cluster Removal | |
|
|
|
| Cadillac Seville Cluster Removal | |
| Cadillac Seville Cluster Removal - Picture | |
|
1. Remove fuses A5 and B5 from rear compartment fuse panel and fuse A3 from engine compartment fuse panel. 2. Using a small flat-bladed tool, remove defroster grill. 3. Remove sunload and headlamp auto control sensors from defroster grill. 4. Remove three upper trim panel retaining screws, through defroster grill opening. 5. Remove heater and A/C vents from instrument panel. 6. Remove four upper trim panel retaining screws, through vent openings. 7. Remove upper trim panel.
Disconnect two electrical connectors from top of instrument panel. 8. Remove four instrument cluster to instrument panel attaching screws, Fig.9 . 9. Raise cluster, remove two screws securing PRNDL mechanism on digital clusters. 10. Remove instrument cluster. 11. Reverse procedure to install.
|
|
|
|
|
|
|
|
|
1. Apply the parking brake to prevent the vehicle from moving. 2. If equipped with an automatic transmission, move the shift lever all the way down to last gear (this will allow you room to remove the bezel). 3. Tilt the steering wheel to the full down position. You do not need to remove the steering wheel as seen in the image. 4. Pull gently rearward on the corners of the bezel from the instrument panel (IP) assembly. There are no screws holding in place. 5. Remove the bezel. 6. Remove the (7mm hex head) screws that retain the Instrument Panel Cluster (IPC) to the I/P assembly. 7. Remove the IPC (2) from the vehicle by tilting the bottom of the cluster outward. 8. Disconnect the IPC harness (1) from the IPC by squezing in it's clamp tab and pulling moderately.
|
|
|
|
|
| z Chrysler Sebring Instrument Cluster Removal 1996-97 | |
| Chrysler Sebring Instrument Cluster Removal 1996-97 | |
|
1. Disconnect the negative battery terminal 2. Remove the trim around the radio and temperature controls. This just pops out, being held by four clips. 3. Remove the fuse cover on the left end of dash. 4. Remove one (1) dash cover screw from inside fuse area 5. Remove four (4) dash cover screws from the radio and temp control area. There are two on each side. The Haynes book says there are three, but that's incorrect. 6. Lower the steering wheel to the lowest position. 7. Remove the dash cover by pulling straight out. There are three (3) or four (4) clips that must be carefully disengaged. I found that when pulling the cover straight towards me while sitting in the driver's seat, the clips disengaged very easily. (Note: if your car is equipped with the temp/directional computer you will need to pull the dash cover away about 2-4 inches. Then reach up through the radio/temp control area and disconnect the plug that attaches to the temp/directional computer). Set dash cover aside, being carefuly not to scratch it. 8. Remove the instrument cluster by removing four (4) screws (two on top and bottom). Now pull straight out on the instrument cluster. 9. Disconnect the two plugs on the backside of the instrument cluster. 10. Remove wiring from the instrument cluster. The wiring harness is held in place by a foam-covered piece of tape. I cut this, and re-taped with electrical tape upon reassembly. You might be inclined to try and pull the tab holding the wiring harness out of the instrument cluster--my advice is don't. Instead, pull the tab away from the wiring harness. The tab is shaped like a "T" with the wiring harness attached to the upper part of the "T" with black electrical tape. I slid each part of the "T" out of the tape and left the tab in the instrument cluster. Now the instrument cluster is free from the vehicle. Be careful not to scratch the front of the instrument cluster. Whenever setting the cluster aside, be sure to do so with it facing upwards.
|
|
| 1988-93 Olds Cutlass Dash Removal | |
| Click Here For Removal Information | |
|
|
|
| 1999-2002 Chevy Silverado/GMC Sierra Cluster Removal | |
| Bezel Removal | |
|
1. Apply the parking brake to prevent the vehicle from moving.
2. Move the shift lever all the way down (if the transmission is automatic).
3. Tilt the steering wheel to the full down position.
4. Pull gently rearward on the retaining clips holding the bezel to the instrument panel (IP) assembly.
5. Remove the bezel.
|
|
| Cluster Removal Step 1 | |
|
1. Remove the screws that retain the IP cluster to the IP assembly.
|
|
| Cluster Removal Step 2 | |
|
1. Remove the IP cluster from the vehicle by tilting the bottom of the cluster outward.
2. Disconnect the IP cluster harness from the IP cluster.
|
|
| 2003-2006 GM Truck Cluster Removal | |
|
1. Apply the parking brake to prevent the vehicle from moving.
2. If equipped with an automatic transmission, move the shift lever all the way down to last gear (this will allow you room to remove the bezel).
3. Tilt the steering wheel to the full down position. You do not need to remove the steering wheel as seen in the image - "Picture 1" below.
4. Pull gently rearward on the corners of the bezel from the instrument panel (IP) assembly. There are no screws holding in place. See "Picture 1" below.
5. Remove the bezel.
6. Remove the (7mm hex head) screws that retain the Instrument Panel Cluster (IPC) to the I/P assembly. See "Picture 2" below.
7. Remove the IPC (2) from the vehicle by tilting the bottom of the cluster outward. See "Picture 3" below.
8. Disconnect the IPC harness (1) from the IPC by squezing in it's clamp tab and pulling moderately. See "Picture 3" below.
|
|
| Picture 1 | |
|
|
|
| Picture 2 | |
|
|
|
| Picture 3 | |
|
|
|
| 2004 Chevy Impala Cluster Removal | |
|
Tools required: 1 Phillips screwdriver 1. Open front doors and leave them open. Remove the exposed left and right fuse panel covers by pulling straight out with a finger in the hole. Remove single Phillips screw from each end of the dashboard plastic where it wraps around. 2. Remove two screws from the dashboard above the instrument cluster. 3. Depressing two clips, lower the plastic cover above the foot pedals and let it hang carefully on the footlight wires exposing two screws holding a panel below the steering column. 4. Remove the two screws from this panel, lower the front slightly and pull it towards the steering wheel. It should pop off exposing a single screw on the bottom of the dashboard plastic to the left of the steering column. 5. Remove this single screw and the whole dashboard can now be pulled off from around the instrument cluster, radio and steering column for its full length. The heater vents come with it. Pry gently but firmly with fingers across the top and bottom, back-and-forth across the full width until all the dashboard clips snap out. The steering wheel should be lowered fully and the gear lever put in first gear to get it out of the way. This will require having the key in and in the ON position. The dashboard will pull over the key. There is a plastic insert with the off/on/acc. key positions which snaps over the key lock and it may come off with the dashboard. Once the dashboard is reinstalled simply snap it back in. Once all the clips have released pull the top of the dashboard toward you carefully so the four-way flasher switch on the upper right of the cluster is clear of the top of the dash. Squeeze the clip and remove the plug from the back of the switch. This done, the whole dashboard can be removed carefully from the car. It is long and flimsy. 6. There are four screws holding the exposed instrument cluster in place. Remove them and pull the cluster gently towards the steering wheel exposing the single wiring harness plugged into the top right of the cluster. Squeeze the single tab on the plug fully and pull it out of the cluster. Remove the cluster fully from the dash.
|
|